Thursday, December 31, 2009

mall of america christmas bulb decorations in 3D

share to facebook button
mall of America bulbs in 3d
My brother took this photo at the Mall of America. I had just seen a cable tv program that talked about how big those bulbs are. To view sit 3' back from your computer and cross your eyes until the images line up.

Working thorugh Richard Mcdermott Miller Figure Sculpture in Wax and Plaster. 4: sketching a small figure in wax

share to facebook button
lost wax figure sketchGonna go through this whole book. But here is where I started.
My first figure sketch in wax.

Richard Mcdermott Miller Figure Sculpture in Wax and Plaster review by me.

Figure Sculpture in Wax and Plaster $11.96 new on Amazon.


Northstar Class Action For Student Loan Bonus

I thought going for the little nonprofit lender in my hometown would avoid such things. And what happened is my check months late, had to switch lenders the next year, and now this. Total Higher Education (T.H.E.) was not as great as i hoped.

For Qualifying persons and entities in the United States who obtained or co-signed a student loan
held by Northstar or a wholly-owned subsidiary of Northstar
at the time of the Suspension of a Bonus on February 18, 2008
You Could Get A Payment From A Class Action Settlement.


suspension of bonus

diy ice block candle holder using a small trash can.

share to facebook button
This is beyond simple.
Fill a small trashcan or other bucket with water and leave out over night. In the morning it should be frozen part way through on top and sides but not the bottom. Run hot water on it till it releases from the mold. If the bottom is at all frozen tap it until it breaks and let the water out.
ice block candle holder from trash can mold
giant snow lighthouseThe photo shows the trash can DIY one on the left and a store bought mold on the right. The mold from the store has a small pocket of air hexagonal mold for ice candlesin the middle that stops the bottom of the mold from freezing. Now make a bunch and line your steps. Better yet build a 15' snow pile and place it on top forming a lighthouse or something.

Saturday, December 26, 2009

Richard McDermott Miller. Figure Sculpture In Wax and Plaster. Book review.

share to facebook button
Armed with a borders gift card from xmas, thanks Singhs, got this book that I had my eye on. Old book (1971) but is new to me. Great review of basic techniques in sculpting wax and lost wax casting. The book is aimed toward at home hobby sculpting and casting. The biggest highlight for me is the emphasis on material selection and handling. Especially for plaster. High density of quality photos showing each step of the process.
Figure Sculpture in Wax and Plaster $11.96 new on Amazon.


Quickly found a few things that will improve my process.
  • steam burnout of the wax.
  • using nails for blind vents (as shown on right)
  • better process for mixing plaster
Highly recommend this book. As far as i can tell is the best book for beginning to work with wax sculpture and lost wax casting. A good buy for DIY lost wax casters.

The results of my attempts to follow this book

Friday, December 25, 2009

How to take a three dimensional (3-D) photo.

share to facebook button
Mikeisbored now in threedee.
This is by far the simplest method to take 3d photos and requires no special software. I will be writing up a more reliable method with a lazy Susan.... once I figure on e out. But for now if you have steady hands the short of it is:
-take one photo of an object carefully centering the image on one specific spot.
-move the camera 3" to the left or right and center on THE EXACT SAME SPOT. take another photo.
-photoshop the two photos together. Or just open both next to each other and use Grab(on a mac) or screen capture(on a PC)
-TO VIEW: sit 3' back from computer screen and cross your eyes until you line up the two images in the middle.

how to take a 3d photo

These photos taken with my great new Canon PowerShot SD780IS
This dude is the portrait i did in sculpture class of a friend of mine. sawdust glued on a frame of wire and paper.

This has a future as a Halloween costume but I am not sure exactly how yet.

Thursday, December 24, 2009

Jesus relief piece in zinc (mikeisbored Christmas edition)

share to facebook buttonjesus relief in cast zinc
In the spirit of Christmas a religious piece by Mr. Parent.

Wednesday, December 23, 2009

amazon snow delay

Hello,
We're contacting you to let you know about a possible delay in deliveries due to severe weather. Our carriers have assured us they will deliver packages as soon as possible after it's safe for their drivers to do so.
:(

Frozen Sandisk Sansa Clip Fix for OSX (M340)

Just thought I should post how to fix a frozen Sansa clip because it took me so long to figure it out and the Sansa webpage was not at all helpful. The clip was opening up to the starting screen but never going on past that. It also would not show up as a drive on my powerbook.

1. Power down the clip.
2. Turn on the lock.
3. Hold down the middle button and plug in the USB.
4. Drag and drop any file you want to save onto your desktop.
5. When the drive appears got to your Applications>Utilities>Disk Utility
6. Click on erase tab.
7. select ms-dos (FAT)
8. Click erase.


Post any questions in the comment section.

Two metal casting: zinc and aluminum UFO

share to facebook button
I first cast the ship in aluminum using a lost wax method. I then embedded the aluminum ship in a clay structure to represent the ground. The plaster went over the clay and aluminum. Once the plaster set I pulled the clay and poured zinc.
casting with both zinc and aluminum ufo
A nice way to see the contrast of the colors of the two metals

Please check out all my home metal casting projects.

skunk halloween costume for your dog.

share to facebook button
skunk halloween costume for dog
Flour is the one word description.

Forget about deskunking your dog. This halloween skunk you dog!

here he is singing werewolves of london. werewolves of london sung by my dog.

lost foam: Beware the green foam!


lost foam gorillaThis green foam is great to work with. It carves like sandstone and can be worked with your fingers. Sadly, the green foam does not burn out with molten metal.
(corrections does not burn out with molten zinc see comments)

fra angelico annunciation sculpture relief

Annunciation Relief
annunciation in relief zinc
squint real hard and you can see the resemblance to fra angelico annunciation right? right? ok maybe not. simply not the right medium for this kind of detail. plus relief is, like, boring.
fra angelico annunciation

lost packing peanuts foam horse

lost foam horse
would look better with legs.... and a tail. plus something seriously wrong with some proportion that i can't figure out. at the least the front legs are too bulky. point it out in the comment section. I gonna make a new one but not till i figure that out. was my first lost foam with packaging peanut piece.

alberto giacometti inspired lost foam failure

Recently... well in july. was in DC and saw a bunch of great giacometti pieces. Mostly find the texture compelling and think it can be done in lost foam. unfortunately the very thin portions do not lend themselves to the process.
alberto giacometti sculpturealberto giacometti sculpture
alberto giacometti lost foamalberto giacometti lost foam

Sunday, December 20, 2009

Lost foam bull #2


share to facebook button
Lost foam bull #2
lost foam bull number 2
not sure why. much less problems with lost foam bull 1. I think I have it figured out for lost foam bull 3. going to do a "burnout" or washout of the foam with acetone. the other big change is moving away from using any of the more dense pink foam. much harder to burn out. I think that joint to the tail gave me major bubbles.

I have also added a new tag Failure to all the old posts that meet my criteria.

Sunday, December 13, 2009

How to carve a chain from a crayon.

All of my crayon sculptures
share to facebook button
6 crayons later I have a full chain made.
I start by scoring four parallel lines down the crayon. Then I make the crayon into a "+" shape by using the square corner of a little hobby saw. I then notch the shape of each of the links with the same saw. I run a pin along the outside of each of the links parallel to the side of the link. Finally i free the links by working the pin diagonally into the gap between them.

how to carve a chain from a crayon diagramClick here for big image of how to carve a crayon into a chain.
blurry proof it is mobile

Saturday, December 12, 2009

Carving a chain from a crayon first atempt

share to facebook button
crayon chain carvingPost for successful carving of a full crayon chain here


This I have not done yet but have made one link. Very tricky carving. I start by making a + shape and then work them apart with a needle.
I know people work with wood to carve chains but I decided it would be better to try to figure it out on my own. So I refuse to google how to carve a chain until my system works.

Check out all of my
All of my crayon sculptures

Saturday, December 5, 2009

Chimenea inspired diy casting furnace design


share to facebook button
I remember using a chimenea and having extreme heat come out the top. enough to melt change and burn out the steel screens that stop sparks from flying out. This furnace design is inspired by that upward funnel of the heat.

This is the bottom before pouring the concrete. It is a coffee can inside of a plastic flour pot. the coffee can has holes for the three steel rods that support it and will hold up the crucible. both the coffee can and the pot have holes that allow the air input through the aluminum beer bottle. The bottle design is a deviation from the drawing above allowing for insulation in the bottom and a direct air input to the coal.

With the concrete.

The top half is simply a coffee can with a tall thin bottomless can inside of it. This will hold the crucible once i drill holes in the bottom of the coffee can to allow the heat through.

Acetone burnout of lost foam.

lost foam burnout with acetone
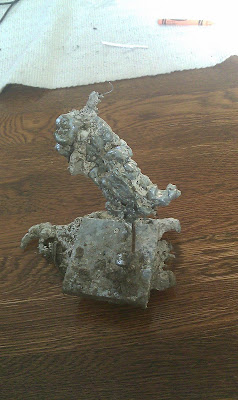
I have been looking for a way to make sure that i get a full burnout of my lost foam. I find the gas created in using the metal really makes it hard to get a perfect casting. It was suggested to me by this guy that i try using acetone.

Very happy with the result. I have not poured yet but I have a clean mold. This mold is another lost foam packaging peanut bull but with extra vents. I test all of the vents by putting a piece of paper in them and seeing if it gets wet. I have also determined the exact volume of metal needed by collecting the acetone that filled the mold. Another upgrade is the large mold in an existing bucket instead of simply burying a thinly coated bull in sand. Hopefully this will make a mold blowout impossible.
share to facebook button