Thursday, January 21, 2010

Making a pot from newspaper using a wine bottle.

little newspaper recycled pot
share to facebook button
Get a sheet of newspaper and a wine bottle, the kind with the little space in the bottom. Fold a sheet of the pennysaver(or other half sheet of newspaper) in half the long way. Fit it halfway up the bottom of the wine bottle. Press the bottom of the paper into the grove in the bottom of the bottle firmly with your fingers. Remove and fill with dirt and seed. When ready to plant it can be left in the paper. Shown above with a pepper seedling.
You should not need to see this boring video to figure it out but just in case:

Show in this video are my seeds from last year. I saved them in a bank envelope which i think is a good way to reuse those envelopes with clear windows.

Credit where it is due i got this idea from this product.

Sunday, January 17, 2010

Poppy Seed Hamentashen Recipe

share to facebook button
Squirrel hill is getting into me.


Disclaimer: I have never made this before, have only eaten it a few times from Cecil's in Saint Paul, and am not Jewish. This is a mashup of online reipes based on what I had available and what sounded good. Mostly I just post this so i can quick find how i made it for next time.

The Filling: 1cup Poppy seeds with one cup boiling water. let cool and then grind in coffee grinder. add 1cup milk. 3/4 cup honey. splash of lemon juice. Heat till it thickens. Let cool and then add an egg.

The Pastry:
2cup self rise flour. (or regular flour plus some baking soda)
1tsp salt
1 cup sugar
(mix)
Cut in 1 stick butter with a pastry cutter
Mix one egg with 1tsp vanilla extract.
Add the egg vanilla mix to the flour and work it until it is dough.
You may need a splash of milk.

Assembly:
Roll out and then cut with a big coffee mug. Add a big spoonfull of filling and fold up the three sides as shown below. bake at 375 for 20 min.


Mike is Bored now on facebook

if you have some serious pathology that leads you to want to know when new content comes up here on your facebook feed then you should Follow Mike is Bored on Facebook

Etched chalk writing beer bottle label for homebrew.

share to facebook button
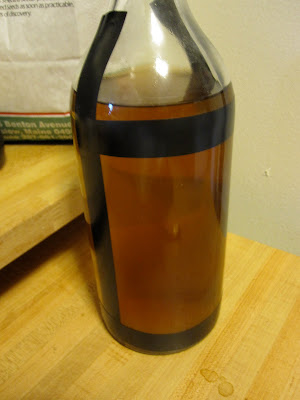
beer bottle etched label1) Start by blocking of a rectangular space with electrical tape


reusable etched beer bottle chalk label armor etch
2) paint on a coat of armor etch over the blocked off area
Armour Etch - 3 oz, Armour Etch Cream


armour etch reusable bottle label chalk3) in 5 min remove the tape and wash off the armor etch.


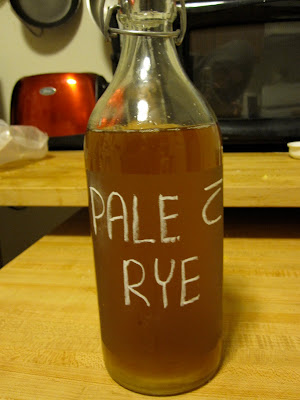
pale ale with rye reusable bottle label

4) Label the bottle with chalk.


The lovely beer shown here is my AG 90%pale two row with 10%rye and a healthy dose of cascade. Name for this recipe will likely be pregnant bender pale with rye


Wednesday, January 13, 2010

Growing Barley Indoors/Where can i get Barley seed for growing my own beer.

I am trying out a new LED grow lamp and want to try to either start early, or completely grow some barley for homebrewing inside.

Where To Buy Barley Seed for Homebrewing: I got mine at Johnnys'. Starting my first batch now but we will see. Organic Two Row Malting Barley

How much to plant: Jonney's suggests 2 lb./1,000 sq.ft. A bucket has a radius of 5.5" and so 95 square inches. which is 0.65 square feet. So i will need to plant 0.0013 lbs. since there are 554 grams in a lb I will need about 0.7 gm in the bucket. Which is way less then my scale can measure.... So I will throw in some random amount of seed and see what happens.

Sprouting: I started the seed under a moist paper towels and a 100w equivalent compact fluorescent to give a little heat and moisture. Since it is cold dark winter. In the spring i will just start under 1" of soil as suggested.

Growing: Now that it has sprouted I am growing this under my 14 watt led grow light.

Tuesday, January 12, 2010

custom pet portrait of my dog, framing a greeting card.

share to facebook button I know you all like seeing photos of other peoples pets right? you are the internet and all. This piece of course fits well with the theme of Mike is Bored...now with more black and white

In any event here is a portrait of my dog. Done by my brother. He has done a bunch of these and sells them with printed greeting cards and the original piece. This is one of the greeting cards framed in a cheap IKEA pine frame with a piece of heavy paper cut for the mat I am not using the acrylic it came with. To get a better sense of the quality of the portrait (and to poor quality of the matting) click on the image to enlarge. This is a very cheap way to fill lot of space and all you need is a box cutter.

It is just a word of mouth business at this point but if any loyal (or otherwise) reader is interested email me at: mikeisboredatblogspot@gmail.com and I can get you a quote... I think.

My dog of course is most famous for being featured in: my dog sings Werewolves of London but dog likers might also be interested in skunk costume for my dog.

Sunday, January 10, 2010

how to use pegboard and molding to frame a huge poster cheap

barbara remington lord of the rings poster hung in frameshare to facebook button Michael's wanted 200 or 300 to do this so i thought it was a DIY situation. This post is a work in progress so I will add as the project moves forward. I am framing my newly aquired copy of Barbara Remington's "wilderness" poster for Tolkins Lord of the Rings.
This is a simple frame that uses only molding, pegboard and some paint. I will not be using acrylic or glass because the glass would be super expensive (190) and the acrylic carried by Homedepot and Lowes comes at the largest in 37x72" sheets at about $45. in any event I can't trim the poster.

0) supplies: 3x8' crystal white OG cap molding. this one that will have a square grove for the board. 8x4' block board. Black paint in the smallest size. (this is what i used. if you are trying this I would consider using pine molding and maybe a lighter backing like a sheet of cardboard.)

1) Cut down Pegboard to the 37x72". I measured marked and then cut with a jigsaw. Should use a rotary saw but I don't have one. The pegboard does give you a nice sense of if you are cutting straight though.

2) Cut the "Crystal White Cap" to the desired lengths. This is some garbage molding that they sell for about $3 for 8'. In retrospect I should have dropped the extra $ to get pine because this is really lousy stuff. Sort of foam like.
This is a tricky cut because the length is a length in the middle of a 45degree cut. I needed to mark the backside of the molding. I made the cut with a hand Miter Box Saw.

crystal white poster frame3) Once the pieces were cut I stapled the back of the molding diagonally as shown with a hand Staple Gun. At this point only the frame is attached the pegboard is just there to hold the angle.

4) I then flipped it over and filled the cracks in the molding with wood glue. held in place with books and let dry overnight. unfortunately it is so cold the wood glue is taking longer then 8h to completely set. Wishing I had used pine so i could get more staples and less glue in.

5)I sanded the glued edges once dry.

6) I then painted the frame with black acrylic paint. Took about three coats to get a complete finish on the glossy molding. Did i mention the crystal white is terrible. I should mention that again.


7) looped some wire through a number of holes in the back of the sheet fro hanging.


8) carefully lined up the frame and taped it to the back of the block board.


Thursday, January 7, 2010

I got a giant 3' by 6' poster, Barbara Remington Lord of the Rings poster

share to facebook button
now to frame. Essentially I am at a loss. 1/4" glass to cover it would cost $190. The guy at the glass shop said any thinner glass will at risk of cracking at such a huge size. Thin Acrylic is much cheaper but I don't know anywhere local to buy it and shipping online is like $100. Thoughts? update: $45 for thin acrylic at homedepot local store is oos but maybe later.

lord of the rings fellowship of the rings book cover bird moving fif
until I have this poster photographed and framed Please enjoy this bird i made from the cover of the first book

//more for my own reference than anything here is the site for hosting moving gifs. http://www.uploadedit.com/_to-upload-animated-gif.htm

Sunday, January 3, 2010

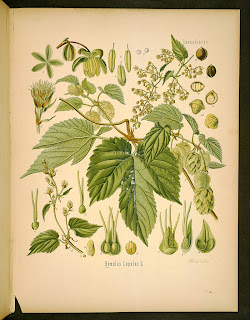
Great hops(humulus lupulus) illustration plates from very old botany books

share to facebook buttonhops plate from medical botany or illustrations humulus lupulus
I plan eventually to make my own. until then here is the source material
i am accumulating. A great set of images to inspire your beer labels.

The first is from google books medical botany or illustrations and descriptions. The text of this book is quite interesting and worth reading. info on lupulin extraction and the role of hops in beer and other medical uses.

hops illustration from flora von deutschland
From a german botany book from 1885. Flora von Deutschland Österreich und der Schweiz by Otto Wilhelm Thomé


humulus lupulus illustration plate from kholers medizinal pflanzen
Kholer's Medizinal Pflanzen.
if you click around this place will sell prints of the images of all the medicinal plants. Tempting but not ready to drop the $40 yet.


Thanks to the help from ubc botanical forums peoples in finding these on the big web.

 Uncertain of the source of this one. Found it on this page.


"National Geographic Society, 1915-1924...elegant and articulate representations of 175 medicinal plants found in North America." Many more Scanned and posted here.


One more with unknown source. posted in Aaron Rossells flicker.
Make Your Own Beer - Shop equipment and ingredients and view helpful videos and tutorials at Northern Brewer - Click Here!