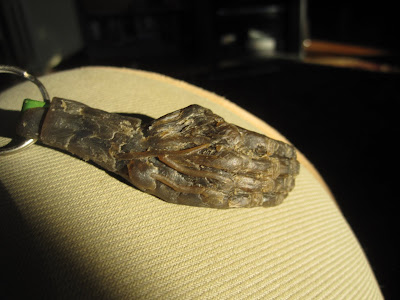
Have wanted to cast my own bottle opener for quite some time. I don't really trust zinc because of how brittle it is to make the mechanical aspect of the opener so I have decided to coat an existing bottle opener with the casting. Built this around a free moosehead bottle opener with wax. Sprued and vented as shown to the left. coated in plaster and burned out in a wood fire. I poured zinc heated in the same fire in a soup can into the mold. this is the first time I have had gotten good wax burnout and pour. Cut sprues with dremel metal cutting blades. May or may not go on to patina it.
Instead of getting done the things i need to get done this week I decided to stop by the Carnegie, photograph my favorites and try to do my own version of them. Here is my painting from looking at Thunderstorm at the shore Martin Johnson Heade. This was done with Holbein Duo Aqua Oil paints on Bristol. I am a big fan of this type of paint that is both water and oil soluble.
Instead of getting done the things i need to get done this week I decided to stop by the Carnegie, photograph my favorites and try to do my own version of them. Here is my painting from looking at van gogh's wheat fields after the rain.This was done with Holbein Duo Aqua Oil paints on canvas. I am a big fan of this type of paint that is both water and oil soluble.
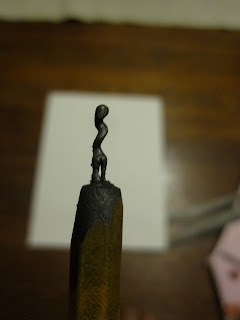
What Dalton Ghetti does makes carving crayons seem crude... which makes me feel stupid. So I thought I would try to imitate/flatter/plagiarizer what he does. Here is my first attempt at carving a tip of a pencil to make a small abstract sculpture. I call it figure looking over its shoulder. I am also open to suggestions on the best way to photograph things this small.
Brodie and I just dropped off our art for Pittsburgh's amazing Art All Night Show. ART ALL NIGHT This year has a sweet location at the old iron city brewery.
And Brodie's This is a clay positive plaster investment zinc casting. Pretty much the same process as this belt buckle. A better photo post patina will be coming as soon as I get down to the show and take it.
Here is the original in foam. Glued together with hot glue
I add a pour spout to get a mass of metal to fill the mold.
here it is coated in plaster. Note the straw. Any "high" points need to be vented in order to fill. In this case the important point is the tip of the nose. I then drill holes through the plaster. This allows the steam created when the hot metal hits the plaster to escape.
I heat the mold in a fire to burn out the foam in advance. (not the standard method for lost foam) Then I bury the mold in regular play sand.
I then pour in the molten zinc into the mold. A video of another pour back when I used a regular fire.
Here it is after pouring the metal. The little spikes are where the mold was drilled
After this the bull is cleaned with a wire brush and given a coat of clearcoat.
The goal of the two piece mold is to allow me to clean the wax out of the mold perfectly as well as dry the mold completely.
The wax sculpture before plaster The front half is dipped in the plaster. Oil is spread over the plaster bottom half and another layer is poured on. Then after setting the two halves are separated. The dark spots on the top half are babbit to allow for the nails to be pulled out even though they are not perfectly straight.
holes were drilled to allow the metal to flow into the mold. and i set a can in plaster to make a spout.
Many projects described on this page aredangerous. Especially any involving molten metal and glass cutting. I describe the safety precautions I use but make no promises that they are adequate.
This page contains advertisements.I try to show only products and retailers with whom I have a personal history (with the exception of "targeted" ads by google).