Showing posts with label printing and painting. Show all posts
Sunday, October 6, 2013
Saturday, December 8, 2012
Shrag- Devastating Bones
Hooray! My painting was included on Shrag's new 45 single Devastating Bones
Other paintings of bones.
Sunday, December 2, 2012
DIY Block Printed Christmas Wrapping Paper.
As the trend towards artisanal wrapping paper continues Mike Is Bored presents: Printing your own wrapping paper.
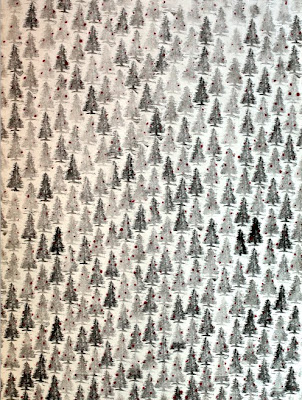
Needed is:
Linoleum Cutter
Linoleum Blocks
Soft Rubber Brayer (AKA that roller thingy)
Graph Paper.
Paint of some sort.
Other paper to print on (TBD)
Please keep in mind that most people on your gift list might prefer squid or octopus wrapping paper.
Block print DIY Wrapping paper- Thanks for the photo Rubidium Wu |
Linoleum Cutter
Linoleum Blocks
Soft Rubber Brayer (AKA that roller thingy)
Graph Paper.
Paint of some sort.
Other paper to print on (TBD)
Well I guess we can start out with how to make any wallpaper pattern in case trees are not your thing.
1) The stately square without which wallpaper is but the fevered dream of a madman. 6x6 in this case. Easy to see how we can line them buggers up to make a consistent pattern. If you don't understand how to do that you can look at your trusty graph paper for an example.
2) Now to modify the square. Any square in the graph paper can be slid to the opposite side and they will still lock up just fine.
3) Ah. Looks like a tree already.
4) draft of the final image is done on paper.
5) GOOOLDEN RINGS!.... or a cut out of the pattern to trace on to the linoleum sheet.
6) after tracing on the pattern on to the linoleum I cut it out with a box cutter.
7) cut away all the parts of the linoleum that are not the tree using a Linoleum Cutter
8) Roll on your ink and stamp away.
9) I added decorations to the trees using nail polish.
10) after making the original I had the photo printed as an engineering print at staples.
Wednesday, August 1, 2012
DIY frame for canvas painting from hardware store
Molding seen on edge. The thin end will be the outside of the frame. |
This project used:
-molding which can be purchased at a hardware store seen on end to the right.
-wood glue
-corner clamp
-cheap mitre box
-black stain
-gold acrylic paint.
1) Calculate the needed length of wood. To do this first measure the size of the object to be framed. In this case the painting was 24x4". Next measure the width of the molding being used. In this case it was ____. The sides of the frame will need to be the length of the object + 2 times the width of the molding. This length will be the outside length of your wood. The inner length will be the size of the object to be framed.
The frame being glued with pony corner clamp |
2) Cut the frame with your mitre box
![]() |
Painted Black |
5) Paint it as desired. I used a black stain and then I painted highlights with gold acrylic paint from the art shop.
![]() |
With trim added |
Friday, July 6, 2012
Thursday, April 5, 2012
Monday, January 2, 2012
Wednesday, November 23, 2011
Sunday, August 14, 2011
Saturday, April 30, 2011
Sunday, April 17, 2011
Art all night 2011 My favorites
Gatoropolis by Ian Olson. This 13yo has a lot of nerve posting it as NFS as it was the one painting I was most interested in purchasing this year.
Arivals by Heidi Tucker was super sweet
My own entry elephant
Arivals by Heidi Tucker was super sweet
My own entry elephant
Sunday, January 30, 2011
how to build a cheap frame for a painting
So I start buy buying molding from the hardware store
measure (on the inside of the inner rim) and cut 45deg angles with a Mitre Box
After cutting I tape the inside, and open the outside and put in woodglue.

Then clamp while the glue dries.
wow. done. that was quick.
measure (on the inside of the inner rim) and cut 45deg angles with a Mitre Box
After cutting I tape the inside, and open the outside and put in woodglue.
Then clamp while the glue dries.
wow. done. that was quick.
Tuesday, December 14, 2010
Rothko/threepixel minimalism inspired Zoidberg painting
Looking at and thinking about these:


Made me make this:
explaination of the sources
On the left is #10 by Mark Rothko at the Seattle Art Museum, The middle one is a three pixel minimalist rendition of Dr. Zoidberg. more info on that here, the right side is the subject of the piece.
More posts about Zoidberg and Futurama.
Any thoughts on how to improve this? Change any colors? add eyes? cut down the detail? Tell me in the comment section.
Wednesday, December 1, 2010
Ilium, Ischium, Pubis hip bone painting
Oil on bristol. Posterior view. I use this great atlas Rohen's Color Atlas of Anatomy and Anatomy For The Artist.
This was done with Holbein Duo Aqua Oil
paints on Bristol.
This was done with Holbein Duo Aqua Oil
Subscribe to:
Posts (Atom)