Showing posts with label Plants. Show all posts
Showing posts with label Plants. Show all posts
Saturday, July 25, 2015
Wednesday, January 15, 2014
dioscorea elephantipes in turtle shaped pot
Sunday, November 3, 2013
Pseudolithos cubiformis
Tuesday, October 16, 2012
Does the Dioscorea caudex grow faster underground
I have read this many places online and did a small test using 4 seeds of Dioscorea Elephantis. After 4 months there was a clear difference between the underground and above ground seeds with the buried caudex being larger and much lighter in color.
To better test this assertion that I have read on many webpages I am germinated 24 seeds of Dioscoreaceae Meixcana. I have not sorted out the complete plan but once I know how many germinate I will attempt to grow 4 to a 4" pot and randomize two per pot to being covered completely v. 50%. I will then follow caudex width, length, estimated volume as well as number of leaves and survival every 6 months. I don't believe I have all the info I need to do formal power calculations but I am certain that this number could detect the effect if it is as impressive as my experience with D. elephantis. If no effect is appreciated in this size that would be more then enough info to guide the treatment of these plants by fellow amatures.
Suggestions?
Thursday, May 3, 2012
Copiapoa hypogea lizard skin
The newest member of my ugly cactus/succulent collection. Fresh from the huntington botanical garden annual plant sale.
 |
Copiapoa hypogea
|
Saturday, March 31, 2012
dioscorea elephantipes (elephant foot plant) from seed.
 Went online and got some dioscoreaa elephantis seeds. They look like little propellors that fall off of maple treees.
How to sprout discorea elephantipes: They were easy to sprout in a small pot with good draining cactus mix (1/3 comercial potting soil, 1/3 sand and 1/3 perilite) tied up in a opaque plastic bag and put in a eastern window for two weeks.
 |
| just after sprouting you can see the caudex on this little dioscorea elephantis seeding |
 |
| at one month the caudex is much larger |

 |
| 8 months |
But some wonderfull day they will look like this
 or more likely like this wonderful specimen at the huntington gardens. That may be a while though because this softball sized creature is almost 30 years old.... though probably younger then the tortoises. Maybe older then our shelled friend is this huge specimen also a the huntington gardens.
 |
| Oldest dioscorea elephantipes around 80 years |
Similar but unrelated here is what it looks like at the top of Devils Pollpile in California
Tuesday, February 14, 2012
Conophytum Calculus from seed
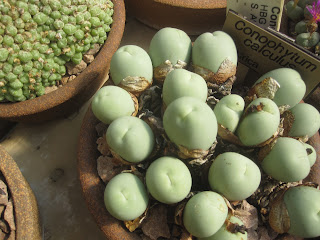
As an alternative to my ugly cactus/succulent collection post category I have also started some conophytum calculus seeds just sprouted today. The first members of my cute cactus/succulent collection. Photo of seedlings later. For now here are the beauties at Huntington gardens in LA. I rename them funny little smiling face cactus (tho not technically cacti)
Started them in the same way as the pseudolithos in the previous post.
My knowlage of succulents, limited though it is, comes from The Timber Press Guide to Succulent Plants of the World: A Comprehensive Reference to More than 2000 Species and Toms blog Theatrumbotanicum
Started them in the same way as the pseudolithos in the previous post.
My knowlage of succulents, limited though it is, comes from The Timber Press Guide to Succulent Plants of the World: A Comprehensive Reference to More than 2000 Species
Monday, February 13, 2012
Pseudolithos migiurtinus from seed
Bought some Pseudolithos migiurtinus seeds on ebay.
I have them controlled for temp, light and humidity using a light bulb for heat, my LED grow lamp for light and plastic bags for humidity. Heat is easily controlled by checking the temp and moving the light bulb. As for soil I started with a commercial cactus soil.
Here they are just sprouted about 5 days after planting them:
On DOL 3 transfered one to a more appropriate soil:
-one part commercial potting soil (baked in oven to sterilize)
-one part perlite
-one part washed play sand
Much larger at 2 and a half months old
As I had been warned was possible if not likely with this species it suddenly melted away overnight. No idea why. About a year and a half old at the time.
Sunday, December 11, 2011
Lophocereus schottii monstrose; the real christmas cactus
The first member of ugly cactus collection.
aka pachycereus?
Labels:
christmas,
nonpine christmas trees,
Plants,
ugly cactus
Friday, December 2, 2011
Christmas cactus (Schlumbergera) DIY grafting experiment
 This was a quick experiment to see if I could graft a chirstmas cactus (Schlumbergera) to an Epiphyllum. No idea if this will work or if these are compatible plants. Of note I am doing this in December while I have read it is better done in spring.
 I did this with a very sharp knife and a piece of scotch tape. I found it easier to cut the scion (the top part of the final product) first then trace it to get the exact matching shape on the stock (the bottom part of the final product). I them matched them up as well as i could and taped them in place.
Saturday, April 3, 2010
Hops shoots with garlic and oil recipe.

I guess it is suggested you cut back to about 5 shoots per plant for best yield. The internet suggested that you can eat the hops shoots. So I did. Only the nice purple ones that had not spread leaves tasted any good the others were much too tough.

They can be prepared like you would asparagus. for me that means coated in olive oil with garlic salt and pepper. Then I broil on high until they start to change color.
What do they taste like? garlic olive oil and salt.
Is it safe to eat hops shoots? I plan on updating this blog later today or tomorrow. If there is another post the answer is yes.
Discussion on eating hops shoots on the grow hops list here
Monday, March 29, 2010
pizza box and newspaper plant nursery

This holds about 25 of the recycled newspaper paper pots shown in this post.
Simply a pizza box lined with the plastic I took off the window (SPRINGTIME!).

After filling the pots with soil and a variety of seeds and water I add another layer of wet newspaper. I then fold the plastic over to trap the moisture.

A lamp heats the seeds to germinate quickly. I will pull the plastic back in about 5 days.

Sunday, March 21, 2010
Hops growing in a pot year two.

So the hop wintered over very well. very very well. All i did was cover it in a foot of mulch. So I guess that is adequate frost protection in pittsburgh.
For spring I just dumped the pot cut the thick coiling rhizomes and gave it fresh soil to work on. It had pretty much filled the pot with roots.
The dumping process was a challange. I was trying to lift it and found that it was very heavy. The reason was that the four small drain holes in the pot had huge roots growing through them anchoring the pot to the ground.

So when I say hops can grow in pots I guess I mean they can but try their best to get out. here are the shoots comming up in force for the spring:

Wednesday, February 3, 2010
Planning for spring with Square Foot Gardening by Mel Bartholomew
 My Brother got this book as a Christmas gift and I have been digging (lol) through it for tips for next year. Will be growing the same plants as always but using some of his tips to hopefully improve the harvest.
1) I will be building up as he suggests with a 1:1:1 compost/vermiculite/peatmoss mix. I will likely not go for the full 6" as my existing soil is fairly good and was mixed with compost in the fall.
2) Excited about the appendix with timing for starting seeds and transferring seeds outdoors.
- Broccoli (12w before spring frost, 5w before spring frost)
- Lettuce (7w before spring frost, 4w before spring frost)
- Pepper (7w before spring frost, 2w after spring frost)
- Summer Squash (2w before spring frost, after spring frost)
- Tomato (6w before spring frost, after spring frost)
- Basil (4-6w before spring frost, whenever soil is warm)
3) Lots of other info on his particular system for making the plant beds and structures for his system.
Going to be trying out the new led lamp for starting seeds this year and using the paper pots from this post for the larger plants.
Of course this book did not cover the barley, for homebrewing, which I will start outside a few weeks before the first frost and the hops which are perennials.
Here is the book: All New Square Foot Gardening: Grow More in Less Space!
Thursday, January 21, 2010
Making a pot from newspaper using a wine bottle.


Get a sheet of newspaper and a wine bottle, the kind with the little space in the bottom. Fold a sheet of the pennysaver(or other half sheet of newspaper) in half the long way. Fit it halfway up the bottom of the wine bottle. Press the bottom of the paper into the grove in the bottom of the bottle firmly with your fingers. Remove and fill with dirt and seed. When ready to plant it can be left in the paper. Shown above with a pepper seedling.
You should not need to see this boring video to figure it out but just in case:
Show in this video are my seeds from last year. I saved them in a bank envelope which i think is a good way to reuse those envelopes with clear windows.
Credit where it is due i got this idea from this product.
Labels:
bottles,
Plants,
sort of reusing/recycling,
wine bottle
Thursday, September 17, 2009
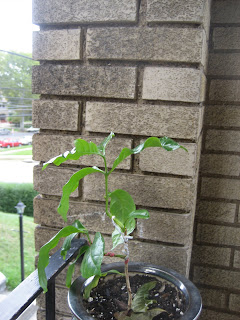
bonsai coffee tree
 This is just getting started but it is a clipping from a coffee plant that I rooted with rooting hormone. So far I pinched of the top leaves so that it would branch and then bent in with a twist tie. the green parts are still bendable but the brown parts are not.
Better photos will follow when the sun is up.
forum discussion of the subject

Here is the plant a 4 or 5 months later with the areas that were bent becoming more woody.
Wednesday, September 16, 2009
Hydroponic lettuce 500ml square media bottle
 Another in the long series of various hydroponic bottles. This is a 500ml square bottle (the kind cell culture media comes in). I cut it in half with a hack saw and flipped the top. This year I let the lettuce go to seed and started some new little plants to do hydroponically. There are a few now but I will split them up when bigger.
Better photo to follow when I find my camera charger.
Obviously don't do this with a bottle that held anything dangerous. My rule is if I would not drink it don't use for hydroponics.
Wine, soda, PBS(as this case), sterile water.... OK.
Acetone, paraformaldehyde, Blush wine..... NO.
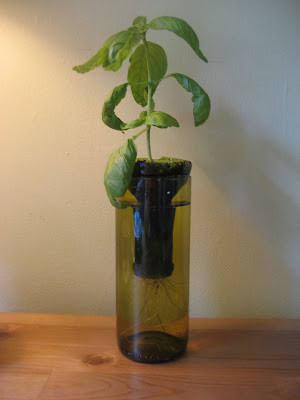
 Post about wine bottle hydroponics
How to cut a wine bottle with string and acetone
Subscribe to:
Posts (Atom)
 Growing, Brewing beer
 Casting and sculpture
 Printing and Painting
 Bottles
 Recipes
 Toys and Games
 Crayon Carving
 Other/Contact


