From the class room (the best drawing ideas have been invented when drawing while bored in class) to an airplane here are the things that I (and my brother) like to draw when bored.
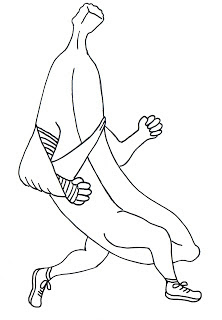
1. From chuck does art, and making as much sense as any other, can I recommend drawing a running banana with a broken arm.
2. Draw patterns that make good wallpaper. Tutorial to come.
3. Draw in 3D. Tutorial to come.
4. take an 8x10" piece of graph paper and fill every single box with a different pattern. Photo to come when I find my 5th grade notebook.
-this post in progress send me your suggestions!-
If you are bored enough to be reading this you should check out all my things to do when you are bored RIGHT NOW.
Showing posts with label I am bored right now what should i do. Show all posts
Showing posts with label I am bored right now what should i do. Show all posts
Wednesday, November 28, 2012
Saturday, August 14, 2010
Carving the Tip of a Pencil.
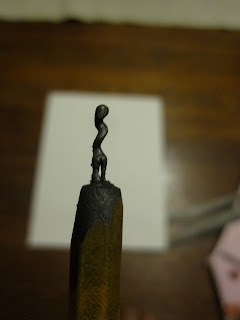
What Dalton Ghetti does makes carving crayons seem crude... which makes me feel stupid. So I thought I would try to imitate/flatter/plagiarizer what he does. Here is my first attempt at carving a tip of a pencil to make a small abstract sculpture. I call it figure looking over its shoulder. I am also open to suggestions on the best way to photograph things this small.
Saturday, July 24, 2010
Friday, December 25, 2009
How to take a three dimensional (3-D) photo.

Mikeisbored now in threedee.
This is by far the simplest method to take 3d photos and requires no special software. I will be writing up a more reliable method with a lazy Susan.... once I figure on e out. But for now if you have steady hands the short of it is:
-take one photo of an object carefully centering the image on one specific spot.
-move the camera 3" to the left or right and center on THE EXACT SAME SPOT. take another photo.
-photoshop the two photos together. Or just open both next to each other and use Grab(on a mac) or screen capture(on a PC)
-TO VIEW: sit 3' back from computer screen and cross your eyes until you line up the two images in the middle.

These photos taken with my great new Canon PowerShot SD780IS
This dude is the portrait i did in sculpture class of a friend of mine. sawdust glued on a frame of wire and paper.
This has a future as a Halloween costume but I am not sure exactly how yet.
Sunday, December 13, 2009
How to carve a chain from a crayon.
All of my crayon sculptures

6 crayons later I have a full chain made.
 I start by scoring four parallel lines down the crayon. Then I make the crayon into a "+" shape by using the square corner of a little hobby saw
 . I then notch the shape of each of the links with the same saw. I run a pin along the outside of each of the links parallel to the side of the link. Finally i free the links by working the pin diagonally into the gap between them.
 Click here for big image of how to carve a crayon into a chain.
blurry proof it is mobile

6 crayons later I have a full chain made.
 I start by scoring four parallel lines down the crayon. Then I make the crayon into a "+" shape by using the square corner of a little hobby saw
 Click here for big image of how to carve a crayon into a chain.
blurry proof it is mobile
Saturday, April 19, 2008
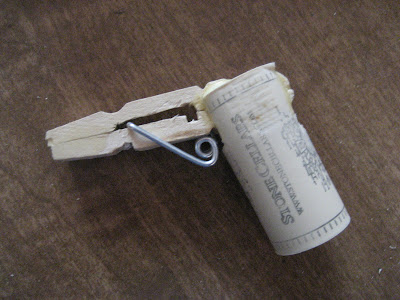
Match Gun (or peg gun) made from clothespin and cork

HOW TO BUILD THE MATCH GUN (AKA MATCH SHOOTER, CLOTHESPIN GUN, PEG GUN)

This spring powered toy made out of only things you have in the house already is seriously great. If you have any questions post them in the comments section and I will address them.
What you need:
Wooden match, Sandpaper, a wooden clothespin (this will be the peg for the peg gun), Miter saw, a cork and some rubber bands.
A Dremel tool will make this much quicker but is not needed. Masking tape and twist ties can be used for some tweaking of the design.
Step one: disassemble your clothespin.
Step two: using your Miter saw and sand paper carve out a pathway that is the width of a match and another space for the metal clip to pass through that is the same width one half of the clothespin. See photos.


Step Three: Take the other half of the clothespin and make a notch for the spring to clip in. See photo for before and after comparison.

Now test your sanding job by rubberbanding the two halves together and trying to launch a match. If you are unable to cock the gun by pushing a match through the barrel you will need to either cut it again with a less deep grove or fill part of your grove with tape.
If you are having trouble with getting the metal part in see the photos at the end of the post.
Step Four:If it worked you can now glue it together with wood glue. Put the rubberbands on to hold it tight while it dries.
Step Five: While that is drying it is time to prepare the cork. Cut a grove in the cork that is the width of the clothespin that is slightly angled so that when inserted the clothespin makes a ~110 degree angle.


Step Six: Once the Glue is dry take of the rubber bands and glue on the cork. I used a vice grip to hold it tight while drying.

Once this is dry you are done. Now make another and challenge your friends.

Placing the metal part.


Subscribe to:
Posts (Atom)
 Growing, Brewing beer
 Casting and sculpture
 Printing and Painting
 Bottles
 Recipes
 Toys and Games
 Crayon Carving
 Other/Contact


