Showing posts with label best of mike is bored. Show all posts

Friday, April 16, 2010

Lost Foam Bull #4


Here is the original in foam. Glued together with hot glue

I add a pour spout to get a mass of metal to fill the mold.

here it is coated in plaster. Note the straw. Any "high" points need to be vented in order to fill. In this case the important point is the tip of the nose. I then drill holes through the plaster. This allows the steam created when the hot metal hits the plaster to escape.

I heat the mold in a fire to burn out the foam in advance. (not the standard method for lost foam) Then I bury the mold in regular play sand.

The metal is heated with this simple diy home casting furnace using regular charcoal and a normal can that food comes in. Zinc can be scraps or from Rotometals.com.

I then pour in the molten zinc into the mold. A video of another pour back when I used a regular fire.


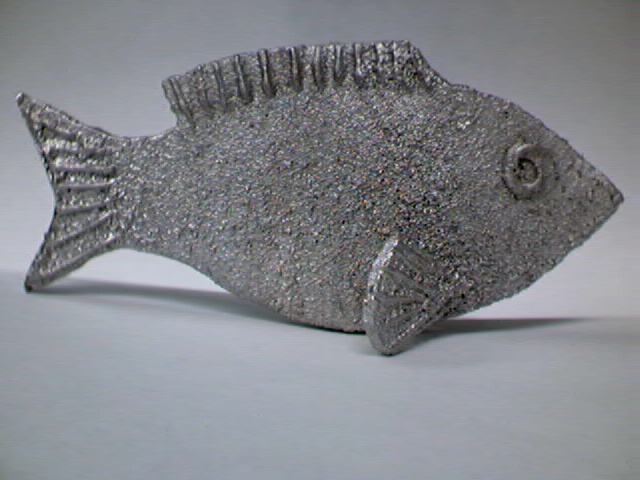
Here it is after pouring the metal. The little spikes are where the mold was drilled

After this the bull is cleaned with a wire brush and given a coat of clearcoat.
share to facebook button


Thursday, January 14, 2010

Etched chalk writing beer bottle label for homebrew.

share to facebook button
beer bottle etched label1) Start by blocking of a rectangular space with electrical tape


reusable etched beer bottle chalk label armor etch
2) paint on a coat of armor etch over the blocked off area
Armour Etch - 3 oz, Armour Etch Cream


armour etch reusable bottle label chalk3) in 5 min remove the tape and wash off the armor etch.


pale ale with rye reusable bottle label

4) Label the bottle with chalk.


The lovely beer shown here is my AG 90%pale two row with 10%rye and a healthy dose of cascade. Name for this recipe will likely be pregnant bender pale with rye


Sunday, December 13, 2009

How to carve a chain from a crayon.

All of my crayon sculptures
share to facebook button
6 crayons later I have a full chain made.
I start by scoring four parallel lines down the crayon. Then I make the crayon into a "+" shape by using the square corner of a little hobby saw. I then notch the shape of each of the links with the same saw. I run a pin along the outside of each of the links parallel to the side of the link. Finally i free the links by working the pin diagonally into the gap between them.

how to carve a chain from a crayon diagramClick here for big image of how to carve a crayon into a chain.
blurry proof it is mobile

Thursday, April 23, 2009

How to cut a wine bottle with acetone and a string

share to facebook button

Written instructions below


(there is an obvious burn risk with this project. You could also loose an eye. )wine bottle that was cut with acetone and a string
  • put on some safety goggles and gloves THESE ARE THE SAFETY PRECAUTIONS I USE BUT MAY NOT BE SUFFICIENT.
  • wrap a string around a wine bottle two or three times and then tie it. I used kitchen string that you use wrapping meat.
  • fill a pot with cold water.
  • soak the string in Acetone , nail polish remover, and put it around the bottle. (presumably other flammables could work for this but I have not tried them. White gas, gasoline, rubbing alcohol..... I make no claims to the safety of this)
  • light the string and rotate is as shown in the video.
  • quickly put the bottle in the water when the acetone is about to go out.
  • you may need to try a few times.
  • this is not a good technique for making drinking glasses because the cut is not that clean. for a cleaner cut check out: How to cut wine bottles with a dremel tool, How to cut beer bottles with a dremel tool

NOW WHAT
This is the technique I used to make the hydroponic zucchini planter from a wine bottle in this post:wine bottle planter

Wine bottle hydroponic zucchini


Wine bottle hydroponic mint and basil


Consider adding a design. Check out my post on how to Etch Glass without using stencils.

Other things people make out of bottles include: Drinking glasses, lamps, wine bottle planter.


share to facebook button

Wednesday, November 12, 2008

DIY casting a belt buckle: Fish, Trilobite and Turtle

Starting with a clay model of the final belt buckle. The clay surrounding it is intended to hold in the plaster that will be used to make the mold.


I made this fish using a pottery tool set like this one:


Next plaster is poured to make a mold for the zinc.


Once the plaster has set the clay is removed.


The plaster cast is heated in a woodfire or BBQ grill.
Zinc is heated in a metal can in a wood fire or coffee can furnace until it is molten.
The molten zinc is poured into the mold and then the back is compressed with a 2x4.
Finally the coat hanger is dipped in to the zinc and held until the zinc sets.
The metal is pulled out of the plaster.

The extra metal is cleaned off with a Dremel tool


Turtle belt buckle DIY trilobite belt buckle diy
Cartoon turtle and Trilobite. Some more of my belt buckles with the same method.

My cartoon turtle belt buckle.
Other online cast metal fishes!

Here is a book that I have really enjoyed about casting: Creative Casting Jewelry Silverware Sculpture
lots of good photos and descriptions of a number of casting processes.

My metal source. is rotometals.com or buy through amazon

Saturday, April 19, 2008

Match Gun (or peg gun) made from clothespin and cork

share to facebook button
HOW TO BUILD THE MATCH GUN (AKA MATCH SHOOTER, CLOTHESPIN GUN, PEG GUN)
clothespin shooting match gun

This spring powered toy made out of only things you have in the house already is seriously great. If you have any questions post them in the comments section and I will address them.

What you need:
Wooden match, Sandpaper, a wooden clothespin (this will be the peg for the peg gun), Miter saw, a cork and some rubber bands.
A Dremel tool will make this much quicker but is not needed. Masking tape and twist ties can be used for some tweaking of the design.

Step one: disassemble your clothespin.

Step two: using your Miter saw and sand paper carve out a pathway that is the width of a match and another space for the metal clip to pass through that is the same width one half of the clothespin. See photos.


Step Three: Take the other half of the clothespin and make a notch for the spring to clip in. See photo for before and after comparison.


Now test your sanding job by rubberbanding the two halves together and trying to launch a match. If you are unable to cock the gun by pushing a match through the barrel you will need to either cut it again with a less deep grove or fill part of your grove with tape.


If you are having trouble with getting the metal part in see the photos at the end of the post.


Step Four:If it worked you can now glue it together with wood glue. Put the rubberbands on to hold it tight while it dries.

Step Five: While that is drying it is time to prepare the cork. Cut a grove in the cork that is the width of the clothespin that is slightly angled so that when inserted the clothespin makes a ~110 degree angle.


Step Six: Once the Glue is dry take of the rubber bands and glue on the cork. I used a vice grip to hold it tight while drying.

how to make clothespin match gun final step

Once this is dry you are done. Now make another and challenge your friends.

share to facebook button
Placing the metal part.


Mario Kart style RC battle


This was fun and relatively simple all you need is two RC cars of different frequencies, rubber bands, push pins and balloons. In this case the cars are TYCO canned heat. I think this is pretty self explanatory so I will not go into a detailed explanation. The only trick is pushing the pin through the rubber band. It seems to work best at a 45 degree angle upward.