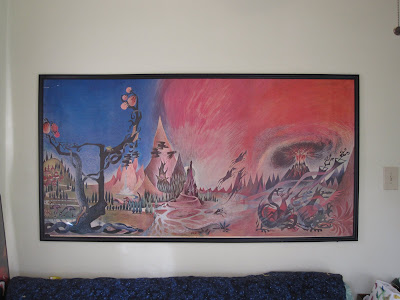
 Michael's wanted 200 or 300 to do this so i thought it was a DIY situation. This post is a work in progress so I will add as the project moves forward. I am framing my newly aquired copy of Barbara Remington's "wilderness" poster for Tolkins Lord of the Rings.
This is a simple frame that uses only molding, pegboard and some paint. I will not be using acrylic or glass because the glass would be super expensive (190) and the acrylic carried by Homedepot and Lowes comes at the largest in 37x72" sheets at about $45. in any event I can't trim the poster.
0) supplies: 3x8' crystal white OG cap molding. this one that will have a square grove for the board. 8x4' block board. Black paint in the smallest size. (this is what i used. if you are trying this I would consider using pine molding and maybe a lighter backing like a sheet of cardboard.)
1) Cut down Pegboard to the 37x72".
 I measured marked and then cut with a jigsaw. Should use a rotary saw but I don't have one. The pegboard does give you a nice sense of if you are cutting straight though.
2) Cut the "Crystal White Cap" to the desired lengths. This is some garbage molding that they sell for about $3 for 8'. In retrospect I should have dropped the extra $ to get pine because this is really lousy stuff. Sort of foam like.
This is a tricky cut because the length is a length in the middle of a 45degree cut. I needed to mark the backside of the molding. I made the cut with a hand Miter Box Saw
 3) Once the pieces were cut I stapled the back of the molding diagonally as shown with a hand Staple Gun
 4) I then flipped it over and filled the cracks in the molding with wood glue. held in place with books and let dry overnight. unfortunately it is so cold the wood glue is taking longer then 8h to completely set. Wishing I had used pine so i could get more staples and less glue in.
5)I sanded the glued edges once dry.

6) I then painted the frame with black acrylic paint. Took about three coats to get a complete finish on the glossy molding. Did i mention the crystal white is terrible. I should mention that again.
 7) looped some wire through a number of holes in the back of the sheet fro hanging.
 8) carefully lined up the frame and taped it to the back of the block board.
 Growing, Brewing beer
 Casting and sculpture
 Printing and Painting
 Bottles
 Recipes
 Toys and Games
 Crayon Carving
 Other/Contact


No comments:
Post a Comment
i'm not here right now but leave a message and i will get back to you as soon as possible.