 Growing, Brewing beer
+in++a+pot.jpg) Growing hops in a pot
Growing hops in a pot Drying hops in a gas oven
 Growing wheat for beer or bread
 Very small scale all grain brewing
 Northern Brewer Coupon/Discount Codes
 Casting and sculpture
 DIY simple casting furnace
 Lost foam figure
 DIY belt buckles
 Rotometals coupon/discount code
 Figure Sculpture In Wax and Plaster
 Printing and Painting
 DIY t-shirt printing
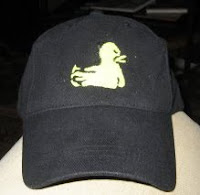 DIY screen printing a hat
 Sticker stencil t-shirt printing
 Painting bones
 Painting Animals
 wallpaper/wrapping paper
 Bottles
 How To Cut Wine Bottles with String and Acetone
 How To Cut Wine Bottles with a Dremel tool
 Glass etching without a stencil
 Re-usable Chalk Bottle Labels
 Recipes
 Spicy Ginger Ale Recipe
 What to do with too much Zucchini
 How to make a great mojito
 How to pickle peppers
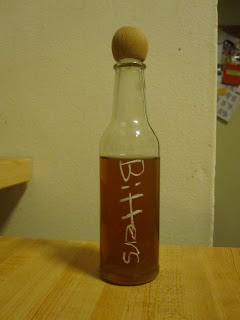 Homemade Bitters
 American flag jello
 sodastream orangina
 sodastream ginger ale
 Toys and Games
 Build a Ladder Golf Set
 Mario Kart RC Battle
 Crayon Carving
 Other/Contact
 Reusing chopsticks
 how to make a dropdown menu with images
 how to add a share to facebook button to your blog
Thursday, October 30, 2008
Check out my other DIY pages.
DIY: Fixing a cracked LCD (and backlight) on a Canon Powershot Elph. SD600 SD790 SD1000 SD1100

Building a Digital Velcro removable Camera LCD Protector/Guard


Saturday, October 4, 2008
Lost foam with packaging peanuts.


The current system:
 Packaging peanuts are glued together with hot glue and pour spouts are made out of pink insulation.I have used both drywall mud and plaster and found that plaster is much better for holding the shape.
  After the foam is coated with plaster it is buried in play sand and the metal is pour over burning out the foam.
Concerns:
Cleaning the plaster off is a pain. Currently I do it by soaking the piece and working out the plaster with a fine metal tool and a wire brush. I was thinking a pressure washer or sand blaster might work well.
The hot glue sometimes obstructs the profusion of the metal. In this piece one of the rear legs is not getting the metal.
buy my ingot from Rotometals. also available through Amazon.

Wednesday, September 24, 2008
Casting a zinc belt buckle.
UPDATE: I have improved this technique and a much better example is on this post:
Make your own fish trilobite or turtle belt buckle.
This is the shape of the Twin Cities with the neck of the dinosaur approximating the path of the Mississippi.

I used:
a small porcelain dish like a evaporation dish or crucible to heat the zinc
UPDATE: This is much easier with a small can like one that veggies come in. Plus it is esentially free instead of $5.
a source of scrap zinc
clay
plaster
a candle
an item you would like to cast
a place to have a fire
a coat hanger
tongs
Sandpaper or a Dremel tool.
To start I pushed the dino into the clay creating a negative. Then fill the hole with wax. This wax will be a positive of the eventual cast.
Next I placed the wax in the bottom of a milk carton and pour plaster over it.
Once the plaster was set I melted the wax out of the plaster by holding in over the fire.
Now the fun begins.
dish with the zinc and waiting for it to melt.
then I pour into the plaster cast
I Bent the coat hanger to attach to the belt as shown below.


Make your own fish trilobite or turtle belt buckle.
This is the shape of the Twin Cities with the neck of the dinosaur approximating the path of the Mississippi.

I used:
a small porcelain dish like a evaporation dish or crucible to heat the zinc
UPDATE: This is much easier with a small can like one that veggies come in. Plus it is esentially free instead of $5.
a source of scrap zinc
clay
plaster
a candle
an item you would like to cast
a place to have a fire
a coat hanger
tongs
Sandpaper or a Dremel tool.
To start I pushed the dino into the clay creating a negative. Then fill the hole with wax. This wax will be a positive of the eventual cast.
Next I placed the wax in the bottom of a milk carton and pour plaster over it.
Once the plaster was set I melted the wax out of the plaster by holding in over the fire.
Now the fun begins.
dish with the zinc and waiting for it to melt.

then I pour into the plaster cast
I Bent the coat hanger to attach to the belt as shown below.


Saturday, September 20, 2008
DIY: Screen printing a hat the cheapest way.


You will need:
Screen printing ink (i used superball that cost about $5 at a local shop but you can probs get it online), a paint brush, a nylon, krazy glue, push pins, a hat (preferably a free hat you don't like.... yet) and some sort of frame. Of course all this can be done on a t-shirt as well.
Also props to craftgrrl for the concept of using nylons.
Start with a hat that needs re-purposing like this cooperate gecko hat:
I don't show this but I blacked out the gecko with black screen printing ink.

Draw your image on a 3x5" note card.

Stretch the Nylon around a frame and tape it down:

Trace the image onto the nylon with a black pen:

Take the card away and cover the lines with Krazy Glue:

Once the glue has dried test the screen on a piece of paper:

If you are satisfied with the image cut out the section of the screen:

Pin the screen to the hat and paint it:


Remove the screen and touch up the design:

Wash the screen let it dry and repeat.
Saturday, August 23, 2008
Saturday, August 16, 2008
DIY: Fix IKEA bed slates falling (Aneboda, Malm, sultan)

So having an Ikea bed that the slats fall out of makes you feel like this. But there is an easy fix. Get a big sheet of cardboard and and staple gun (or brads) and attach all of the stales together so that they cannot shift and fall out. comment if you have tried this or have another great way to fix this common problem

IKEA bed with slats stapled to cardboard prevents them from falling.
Just attach them all together and they cannot shift enough to fall through. Push them all they way out first.
I used the box they came in and a staple gun but you could probably use brads if you don't have a staple gun.
(update: 2/3/09 this is still working. they have not fallen through once since I did this.)
Thursday, July 24, 2008
DIY: Dr Zoidberg Halloween Costume.
Whats that? you want to build a fabulous Crabulous Futurama Halloween costume?
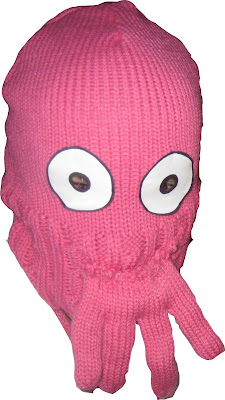

Well here is what you will need:
Knit pink Stocking cap, Gloves, and scarf. (I picked these up in a single pack at Walgreen's for like $10) You might score these pretty cheap on Amazon. The trick is to find all three in a very similar color. The hat must be the long kind that you can pull down over your entire head.
White lab coat. Blue scrubs. Sandals. White Paper. Sewing kit. Black Sharpie. Scissors. Glue.
Lets start with the head
Make sure that the hat is big enough to pull down below your chin.
With the hat on your head draw marks that line up with your eyes and mouth with the sharpie.
Now cut small ~1/2" holes at the eye marks and a larger 2" hole for your mouth.
Optional you may want to stitch up the frayed ends around the holes so that you are not eating hat fuzz all the time. This should also increase the life span of the head.
Now take some extra tassle from the scarf and thread it around the bottom of the hat so that you can tighten it around your neck as shown in the video:
Eyes
Cut 2" circles of paper and fill draw dark circles in the middle.
Cut the middle of the circles out leaving a thin rim of black to simulate cartoon eyes.
Glue the eyes to the head carefully lining up the holes.
Tentacles
Cut the four fingers off of one of the gloves leaving the thumb intact.
Stuff the fingers with shredded newspaper.
Sew closed.
Sew on where your nose is when wearing the hat. This will hide your nose bulge and cover your mouth hole.
Claws
Cut two pieces of the scarf in the rounded shape of the big half of the claw.
Sew these together on all sides but the side that you will need to slip your fingers in.
Sew it to the fingerless glove converting it to a mitten.
Repeat but simply slide the claw over the fingers of the intact glove. (I left this as a convertible glove/mitten in order to have some ability to manipulate objects.)
Getting suited up
Use the remainder of the scarf to cover your neck first and then put on the remaining articles. Here is the final product (shown with one claw in glove form).
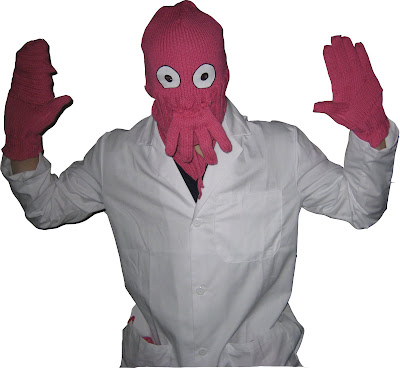
Now lookup your favorite Zoidberg quotes. If you have any questions comment below and I will reply asap.
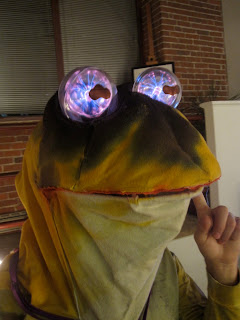
Also check out the hypnotoad costume
 cephlopod fans make sure to check out the giant squid crayon carving
The best medical student Halloween costumes.

Well here is what you will need:
Knit pink Stocking cap, Gloves, and scarf. (I picked these up in a single pack at Walgreen's for like $10) You might score these pretty cheap on Amazon. The trick is to find all three in a very similar color. The hat must be the long kind that you can pull down over your entire head.
White lab coat. Blue scrubs. Sandals. White Paper. Sewing kit. Black Sharpie. Scissors. Glue.
Lets start with the head
Make sure that the hat is big enough to pull down below your chin.
With the hat on your head draw marks that line up with your eyes and mouth with the sharpie.
Now cut small ~1/2" holes at the eye marks and a larger 2" hole for your mouth.
Optional you may want to stitch up the frayed ends around the holes so that you are not eating hat fuzz all the time. This should also increase the life span of the head.
Now take some extra tassle from the scarf and thread it around the bottom of the hat so that you can tighten it around your neck as shown in the video:
Eyes
Cut 2" circles of paper and fill draw dark circles in the middle.
Cut the middle of the circles out leaving a thin rim of black to simulate cartoon eyes.
Glue the eyes to the head carefully lining up the holes.
Tentacles
Cut the four fingers off of one of the gloves leaving the thumb intact.
Stuff the fingers with shredded newspaper.
Sew closed.
Sew on where your nose is when wearing the hat. This will hide your nose bulge and cover your mouth hole.
Claws
Cut two pieces of the scarf in the rounded shape of the big half of the claw.
Sew these together on all sides but the side that you will need to slip your fingers in.
Sew it to the fingerless glove converting it to a mitten.
Repeat but simply slide the claw over the fingers of the intact glove. (I left this as a convertible glove/mitten in order to have some ability to manipulate objects.)
Getting suited up
Use the remainder of the scarf to cover your neck first and then put on the remaining articles. Here is the final product (shown with one claw in glove form).

Now lookup your favorite Zoidberg quotes. If you have any questions comment below and I will reply asap.

Also check out the hypnotoad costume
cephlopod fans make sure to check out the giant squid crayon carvingThe best medical student Halloween costumes.
Subscribe to:
Posts (Atom)


 Posts
Posts

